tmux 설정하기
tmux 는 TTY 멀티플랙서입니다.
이 포스트은 tmux 를 소개하고 설치 및 설정 방법에 대해서 소개하는 글입니다.

그림 1. tmux.
TTY는Tele Type의 약자이고 보통 콘솔이나 터미널을 의미합니다.
tmux가 screen보다 좋은 이유는 다음과 같습니다.
- 명확한 클라이언트/서버 모델을 가지고 있습니다.
(각 윈도우는 유연한 클라이언트로 다른 세션에 자유롭게 붙거나 떨어질 수 있습니다.) - 문서화가 잘 되어있고 일관된 명령어를 가지고 있습니다.
(설정파일인.tmux.conf에서도 동일한 명령어를 사용합니다.) - 스크립트를 쉽게 작성할 수 있습니다.
- 다중 붙여넣기 버퍼를 가지고 있습니다.
- Vi와 Emacs 키바인딩을 지원합니다.
- 상태바를 지원합니다.
Session/Window/Pane
다음은 tmux 의 구성요소인 session, window, pane 을 설명하는 그림입니다.
설치하기
tmux
ubuntu 에 설치하기
# apt-get update
# apt-get install tmux
rhel/centos 7 에 설치하기
tmux 최신 2.9a버전을 빌드하여 설치하는 방법입니다.
; Install tmux on rhel/centos 7

; install deps
# yum install gcc kernel-devel make ncurses-devel

; DOWNLOAD SOURCES FOR LIBEVENT AND MAKE AND INSTALL
$ curl -OL https://github.com/libevent/libevent/releases/download/release-2.1.8-stable/libevent-2.1.8-stable.tar.gz
tar -xvzf libevent-2.1.8-stable.tar.gz
$ cd libevent-2.1.8-stable
$ ./configure --prefix=/usr/local
$ make
# make install
$ cd ..

; DOWNLOAD SOURCES FOR TMUX AND MAKE AND INSTALL
$ curl -OL https://github.com/tmux/tmux/releases/download/2.9a/tmux-2.9a.tar.gz
$ tar -xvzf tmux-2.9a.tar.gz
$ cd tmux-2.9a
$ LDFLAGS="-L/usr/local/lib -Wl,-rpath=/usr/local/lib" ./configure --prefix=/usr/local
$ make
# make install
$ cd ..

; pkill tmux
; close your terminal window (flushes cached tmux executable)
; open new shell and check tmux version
$ tmux -V
만약, tmux 경로가 /usr/bin/tmux 라면 링크를 설정합니다.
# ln -s /usr/local/bin/tmux /usr/bin/tmux
tmux 사용하기
tmux는 Prefix 키(Ctrl+b)를 누른 후 다음 명령 키를 입력하는 방식입니다.
Ctrl+b, <key>
직접 명령어를 입력해야 하는 경우에는 : 키를 입력하여 명령어 모드로 진입해야 합니다.
Ctrl+b, :
단축키 설정하기
Prefix + y 키로 pane 을 동기화하는 명령을 추가하겠습니다.
~/.tmux.conf에 다음 내용을 추가합니다:
bind-key y set-window-option synchronize-panes\; display-message "synchronize-panes is now #(?pane_synchronized,on,off)"
만약
~/.tmux.conf의 내용이 적용되지 않는 경우다음 명령으로 수정된 내용을 적용합니다:
$ killall tmux이나
$ tmux kill-server
ssh 설정
tmux 에서 주로 ssh 를 사용하여 다른 서버에 연결하기 때문에,
먼저 비밀 번호를 입력하지 않고 ssh 를 사용하는 방법을 소개하겠습니다.
다음은 ssh handshake 를 설명하는 그림입니다:
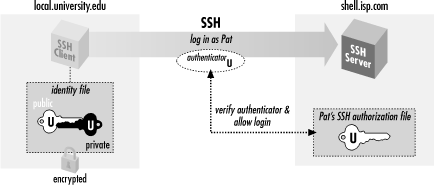
다음은 public 키를 사용한 ssh 인증에 대한 그림입니다:
이제 비밀번호 입력 없이 ssh 로 접근하는 방법을 설명하겠습니다.
1. hosts 파일 작성하기
ssh 로 접근할 호스트를 관리하기 위해 hosts 파일을 작성합니다.
# vi /etc/hosts

127.0.0.1   localhost localhost.localdomain localhost4 localhost4.localdomain4
::1         localhost localhost.localdomain localhost6 localhost6.localdomain6

# host lists
{IP}            {Hostname}
...
2. RSA Key Pair 생성하기
$ ssh-keygen -t rsa
3. Public Key 복사하기
$ ssh-copy-id {user}@{host}
4. Disable the Password for Root Login(Optional)
$ sudo vi /etc/ssh/sshd_config
	PermitRootLogin without-password
다음에 설명하는
Tmuxinator는 tmux 설정 관리를 위한 툴입니다.
Tmuxinator
설치하기
ubuntu 에 설치하기
# apt-get install tmuxinator
rhel/centos 7 에 설치하기
Ruby 최신 버전 설치하기
- 빌드 툴 설치
# yum install curl gpg gcc gcc-c++ make patch autoconf automake bison libffi-devel libtool patch readline-devel sqlite-devel zlib-devel openssl-devel - Ruby 최신 버전 설치
# gpg --keyserver hkp://keys.gnupg.net --recv-keys 409B6B1796C275462A1703113804BB82D39DC0E3 7D2BAF1CF37B13E2069D6956105BD0E739499BDB # curl -sSL https://get.rvm.io | bash -s stable - RVM 사용을 위해 다음 명령을 실행
$ source ~/.rvm/scripts/rvm - Ruby 최신 버전 설치
$ rvm install 2.6.3 $ rvm use 2.6.3 --default - Ruby 버전 확인
$ ruby -v
Tmuxinator 설치하기
$ gem install tmuxinator
sudo: source: command not found
$ sudo -s source /etc/environment
마무리
alias 설정하기
Tmuxinator 이름이 길기 때문에 짧은 별칭(alias)를 정의하면 쉽게 사용할 수 있습니다.
다음 명령으로 별칭 tx 를 ~/.bashrc 에 추가합니다:
$ echo 'alias tx=tmuxinator' >> ~/.bashrc
다음 명령으로 수정된 내용을 적용합니다:
$ source ~/.bashrc
이제부터 tmux 를 실행한 후 tx 라는 별칭으로 Tmuxinator 를 사용할 수 있습니다.


댓글남기기